
Chocolate Molten Lava Cakes: A Simple, Romantic Dessert With a Gooey Center
A dessert that feels decadent—without being complicated
Chocolate molten lava cakes have a reputation: dramatic presentation, a perfectly timed bake, and that unmistakable moment when a spoon breaks through the top and warm chocolate spills out. They’re the kind of dessert many people associate with restaurants or special-occasion menus, which is exactly why they’re such a satisfying choice for an at-home celebration. They look immaculate and feel luxurious, yet they’re surprisingly straightforward to make.
That combination of “wow” factor and simplicity is what makes molten cakes a natural fit for romantic dinners—especially on occasions like Valentine’s Day—while still being practical for a small gathering. This approach yields six individual servings, so it can cap a dinner for two with leftovers, or be plated for a dinner party where everyone gets their own personal cake.
Part of the appeal is how customizable the concept can be. The base is rich, bittersweet chocolate with a smooth vanilla accent, but the method leaves room for swapping chocolates, adding spices, or pairing the cakes with sauces and garnishes you already love. In other words: it’s a dessert that reads as “over-the-top delicious” while staying within reach for home cooks.
What you’ll need: a short list of staples plus optional extras
One reason molten lava cakes are approachable is that the ingredient list is short and familiar, relying on items many kitchens already have on hand. The core ingredients are:
- Butter
- All-purpose flour
- Bittersweet chocolate chips
- Vanilla bean paste
- Eggs
- Granulated sugar
- Kosher salt
From there, you can decide how you want to serve them. Optional additions are less about changing the cake itself and more about building a plate that feels complete and special:
- Chocolate hazelnut spread or fruit jams (as sauces or accents)
- Fresh berries
- Confectioners’ sugar (for dusting)
- Ice cream (for serving)
Because the cakes are intensely chocolate-forward, garnishes and sauces can be used either to reinforce that richness (think chocolate hazelnut spread) or to add contrast (berries, fruit coulis, or a bright jam). Even a simple dusting of confectioners’ sugar can make the finished dessert look polished.
Equipment that makes the presentation work: ramekins and a hot oven
Molten cakes are typically baked and served as individual portions, which is why ramekins are central to the process. For this method, use six 4-ounce ramekins. The size matters because it supports the timing: you want the edges to set quickly while the center remains molten.
Equally important is the oven temperature. The bake relies on a burst of high heat—specifically 450 F—to set the outside before the center loses its soft, lava-like texture. That temperature may seem high for a cake, but it’s the key to the signature contrast between a tender outer structure and a gooey interior.
Step-by-step overview: from prep to plating
Molten cakes move quickly once the batter is ready, so it helps to organize the steps. Start with the oven and ramekins, then prepare the chocolate mixture and egg mixture, combine gently, and bake immediately.
1) Prepare the ramekins
Generously grease six 4-ounce ramekins with butter. Then lightly coat them with flour and shake out the excess. This prep is what allows the cakes to unmold cleanly. If you skip it or do it lightly, the cakes can stick—still delicious, but harder to present as a neat, flipped cake.
2) Make the chocolate base
After heating the butter (the method indicates removing the pan from heat at a key moment), take the pan off the heat, add the bittersweet chocolate chips and vanilla bean paste, and stir until smooth. Set this mixture aside. The goal is a glossy, fully melted chocolate mixture that will fold evenly into the whipped eggs.
3) Whip the eggs and sugar
Beat the eggs and granulated sugar until the mixture thickens and doubles in volume. This step is not just about mixing—it’s about building structure. The aeration created here helps the cakes rise and hold their shape while still staying soft in the center.
4) Fold everything together gently
Fold the chocolate mixture into the whipped egg mixture, then fold in 3 tablespoons of flour and the kosher salt until uniform. The emphasis is on folding gently so you don’t deflate the whipped eggs. You want the batter to be consistent in color and texture before portioning it into ramekins.
5) Portion and bake
Divide the batter between the prepared ramekins. Bake for 10 to 12 minutes, or until the edges are set but the centers are still slightly jiggly. That “jiggle” is the visual cue that the center remains molten.
6) Build the plates while they bake
While the cakes are in the oven, prepare serving plates with chocolate hazelnut spread, fruit coulis, or other sauces you’d like to use. This is a small step that makes service smoother, because molten cakes are best served soon after baking.
7) Unmold and finish
Flip one ramekin at a time onto a plate and unmold. If needed, run a small paring knife around the edge to loosen the cake before turning it out. If a cake sticks despite prep, it can be served in the ramekin instead—still warm, still gooey, just a different presentation.
8) Garnish and serve
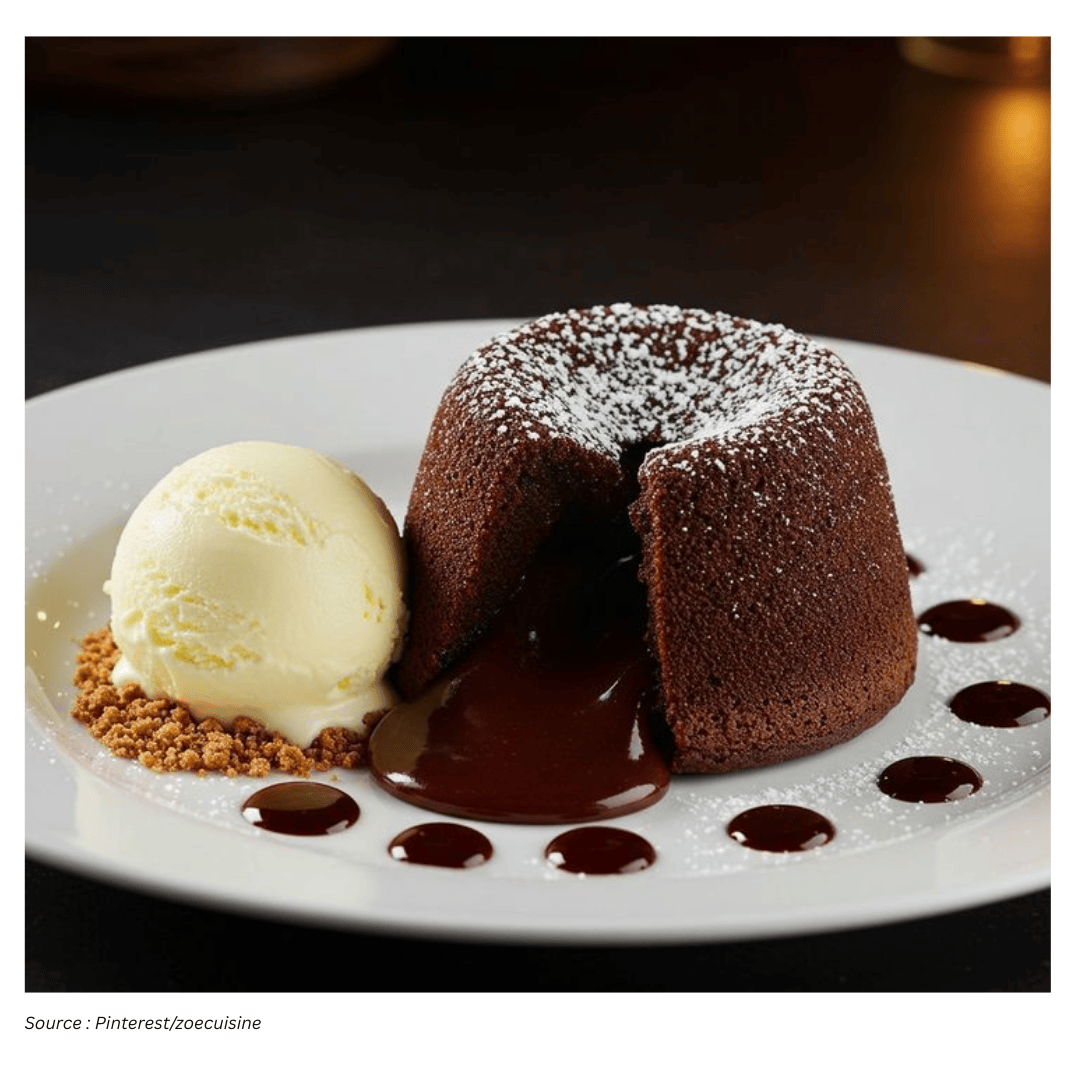
If desired, dust with confectioners’ sugar and garnish with fresh berries and ice cream. The contrast of hot cake and cold ice cream is a classic pairing, and berries add color and freshness that balance the richness.
Timing and doneness: how to keep the center molten
The defining feature of a lava cake is the interior texture, and that comes down to temperature and timing. Preheat the oven early and set it to 450 F. The high heat sets the edges quickly, which helps preserve the molten center.
When judging doneness, focus on the difference between the outer ring and the middle. The edges should look set, while the center should remain slightly jiggly. A toothpick test can help, but it needs to be done thoughtfully:
- A toothpick inserted near the edge should come out clean once the cakes are baked.
- A toothpick inserted into the center should still come out wet—and that’s the goal.
Because the bake window is relatively short (10 to 12 minutes), it’s worth staying close to the oven near the end of baking, especially the first time you make them. The difference between “perfectly molten” and “more set than intended” can be a matter of minutes.
Ramekin prep matters more than you think
Unmolding is one of the moments that makes molten cakes feel like a restaurant dessert. To make that possible, the ramekins must be prepped properly with both butter and flour. Butter creates a slick barrier; flour adds a dry layer that further discourages sticking and helps the cakes release.
If you’re worried about sticking—or if you simply prefer a more casual presentation—serving directly in the ramekin is a perfectly acceptable option. It also keeps the cake warm longer, which can be helpful if you’re serving multiple people and need a few extra minutes to plate.
Flavor variations: keep the method, change the personality
These cakes are designed to let chocolate lead, particularly bittersweet chocolate. Still, the same technique can support different flavor directions depending on what you choose for the chocolate and the aromatics.
Swap the chocolate
- For a more bitter profile, choose darker chocolate (70% and up).
- For a sweeter finish, choose milk chocolate.
Change the flavoring from vanilla
Vanilla bean paste provides a warm, rounded background note, but it can be replaced with other flavor accents. Options include espresso powder, orange zest, or a splash of Grand Marnier or bourbon for a boozy touch. Each of these shifts the mood of the dessert without requiring a new method.
Add spice for depth
Spices can add complexity and make the chocolate taste even richer. Cinnamon and nutmeg bring warmth, while chile powder adds a more unexpected edge. These are small additions that can make the dessert feel tailored to the occasion or to your personal taste.
A practical hack for a guaranteed “lava” center
If the molten center is the main event, there’s a simple safeguard: freeze store-bought truffles until firm, then press one into the center of each cake right before baking. The truffle can be any type you like—caramel, white chocolate, peppermint, and more.
This trick adds two benefits. First, it helps ensure a wet, lava-like middle even if the cakes bake a little longer than planned. Second, it can introduce a new flavor element in the center, turning a classic molten cake into something more personalized while keeping the overall process easy.
Serving ideas that make it feel like an occasion
Molten lava cakes are already a statement dessert, but the way you serve them can elevate the experience further—especially for a romantic dinner or a small celebration.
- Sauce first: Spread chocolate hazelnut spread or add fruit coulis to the plate before unmolding the cake for a composed look.
- Finish with contrast: Add fresh berries for brightness and color against the dark cake.
- Keep it classic: Dust with confectioners’ sugar for a simple, elegant finish.
- Lean into hot-and-cold: Serve with ice cream to complement the warm, gooey center.
Because the cakes are individual portions, they naturally feel thoughtful—each guest receives a complete dessert, already plated. And because the recipe yields six, it’s flexible: a date-night finale, a dinner-party dessert, or a make-ahead plan where you prep your garnishes while the cakes bake.
Why this dessert works for both beginners and confident bakers
Molten lava cakes occupy a sweet spot in home baking. They look intricate, but the technique is manageable: whip eggs and sugar until thickened, fold in a smooth chocolate mixture, portion into prepared ramekins, and bake hot and fast. The doneness cues are clear—set edges, jiggly center—and the serving options are forgiving, whether you unmold onto plates or serve straight from the ramekins.
Most importantly, the recipe encourages customization without requiring a new framework. You can keep the bittersweet chocolate and vanilla for a classic, deeply chocolate profile, or shift the flavor with different chocolate percentages, espresso powder, orange zest, warm spices, or a splash of Grand Marnier or bourbon. And if you want extra assurance, the frozen-truffle center offers a built-in backup plan for that signature ooze.
The result is a dessert that feels special enough for Valentine’s Day, yet simple enough to make any time you want an indulgent, chocolate-forward finish—one that delivers the drama of a molten center with a process that stays refreshingly approachable.